
Ship to all EU countries
Art: NA570EAN: 6442424726649
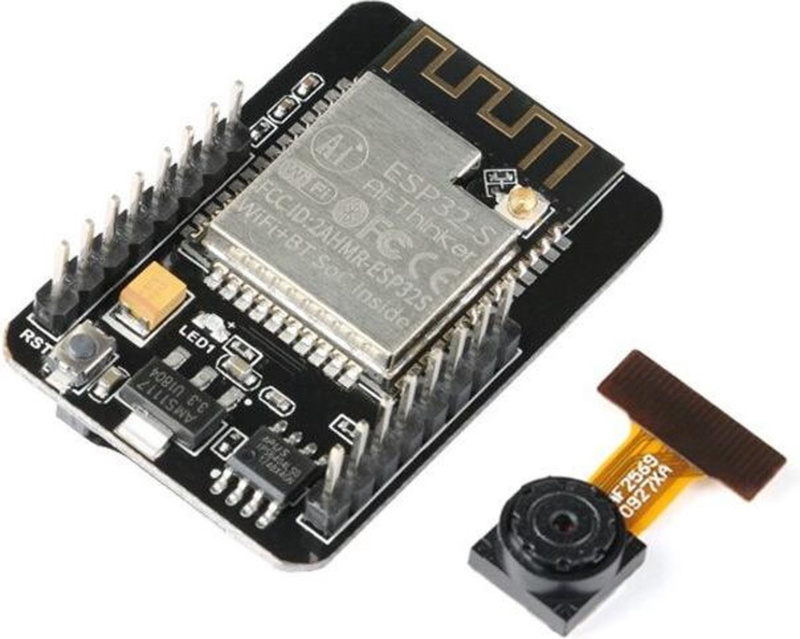
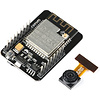
ESP32-CAM development board with Camera, WiFi and Bluetooth (OT103-B53)
Show all:
Microcontrollers,ESP32


Would you like to order large quantities of this product or do you need a quote to order within your organization? Then request a quote.
REQUEST QUOTEThank you for your request.
You will receive the quote in your mailbox within a few minutes.
You will receive the quote in your mailbox within a few minutes.
Ship to all EU countries
Ordered on working days before 3:00 PM = shipped the same day.
30 days cooling-off period
1 jaar garantie
Description
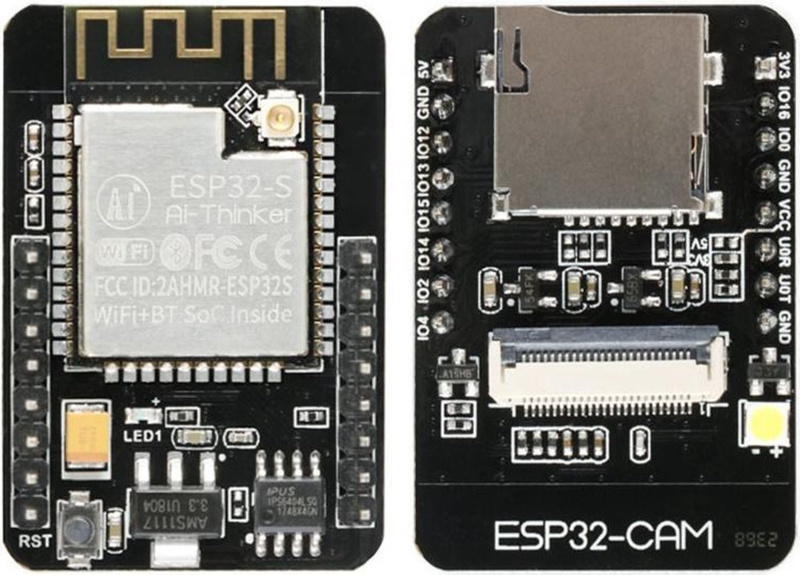
full-fledged ESP32 with a camera module and Micro SD card slot.
The OV2640 camera module contains a 1/4 inch CMOS UXGA (1632 x 1232 pixels) image sensor. It is ultra-small in size and has a low working voltage of 1.7 to 3.3V.
Features:
Ultra-small 802.11b/g/n Wifi + BT/BLE SoC module
Low-power dual-core 32-bit CPU for application processors
Up to 240MHz, up to 600 DMIPS
Built-in 520KB SRAM, external 4M PSRAM
Supports interfaces such as UART/SPI/I2C/PWM/ADC/DAC
Support OV2640 and OV7670 camera with built-in flash
Support WiFI image upload
Support TF card
Support multiple sleep modes
Embedded Lwip and FreeRTOS
Support STA/AP/STA+AP working mode
Support Smart Config/AirKiss one-click distribution network
Support serial local upgrade and remote firmware upgrade (FOTA)
NOTE, this module does not have a USB port. A separate serial USB module (FT232RL) is required to program it.
Installing ESP32-CAM in Arduino IDEBy default, the Arduino IDE software does not recognize the ESP32 board. In order to program the ESP32-CAM in the Arduino IDE, it must first be installed in Arduino IDE. Follow these steps:
In Arduino IDE, go to FILE and then to PREFERENCES.
Enter the following URL under MORE BOARD MANAGER URLS: https://dl.espressif.com/dl/package_esp32_index.json
Now go to UTILITIES, BOARD and BOARD MANAGEMENT
Search for ESP32 and install ESP32 by Espressif Systems
In the list under UTILITIES, BOARD, choose the "AI Thinker ESP32-CAM"
That's it, now you can get started with the ESP32-CAM.
Also watch the Youtube video we added with the step-by-step explanation in English.
Connecting the FT232RL to the ESP32-CAMTo connect the FT232RL to the ESP32-CAM you can use the following scheme:
Do you get the message A fatal error occurred: Failed to connect to ESP32: Timed out waiting for packet header
Important: GPIO 0 must be connected to GND so that the code can be uploaded.
ESP32-CAM
FT232RL
GND
GND
5V
VCC (5V)
U0R
TX
U0T
RX
GPIO 0
GND
_x005F_x000D_
Reviews
Add your review
9.3/10
Spam Filter
Ik gebruik hem als webcam. Via WiFi op mijn netwerk en dan kan ik op het werk kijken wat de huisdieren zoal uitvr*eten als ik niet thuis ben. Laatst vond de hond het nodig om de urne van tante Mies om te stoten en de kat dacht dat de inhoud een nieuwe soort kattenbakvulling was.
Posted on 02/03/2026Rob
Heel makkelijk en snel in gebruik genomen met ESP Home Builder in Home Assistant. Niet vergeten het bijbehorende MB
Posted on 08/11/2025Bert Hoogenboom
werkt heel goed
Posted on 21/07/2025Marcel Vollebregt
Jammer dat er standaard geen USB aansluiting op zit. Los bordje moet je daarvoor kopen.
Posted on 06/05/2025Keessan
Leuke cam om mee te experimenteren en te programmeren.
Posted on 06/05/2025Stan van Stiphout
Top 1 2 3 4
Posted on 05/05/2025Also interesting for you:


Kies je taal / Choose your language:
By using our website, you agree to the usage of cookies to help us make this website better.
Hide this messageMore on cookies »