Ordered on weekdays before 14:00 = shipped the same day and delivered the next day in 98% of cases. Free returns 30-day reflection period 1-year warranty

Wiring diagram and code example

How to connect the I2S DAC with 3W amplifier - MAX98357A to an Arduino UNO or ESP32, with an example sketch you can upload straight away.

MAX98357A I2S Amplifier Demo

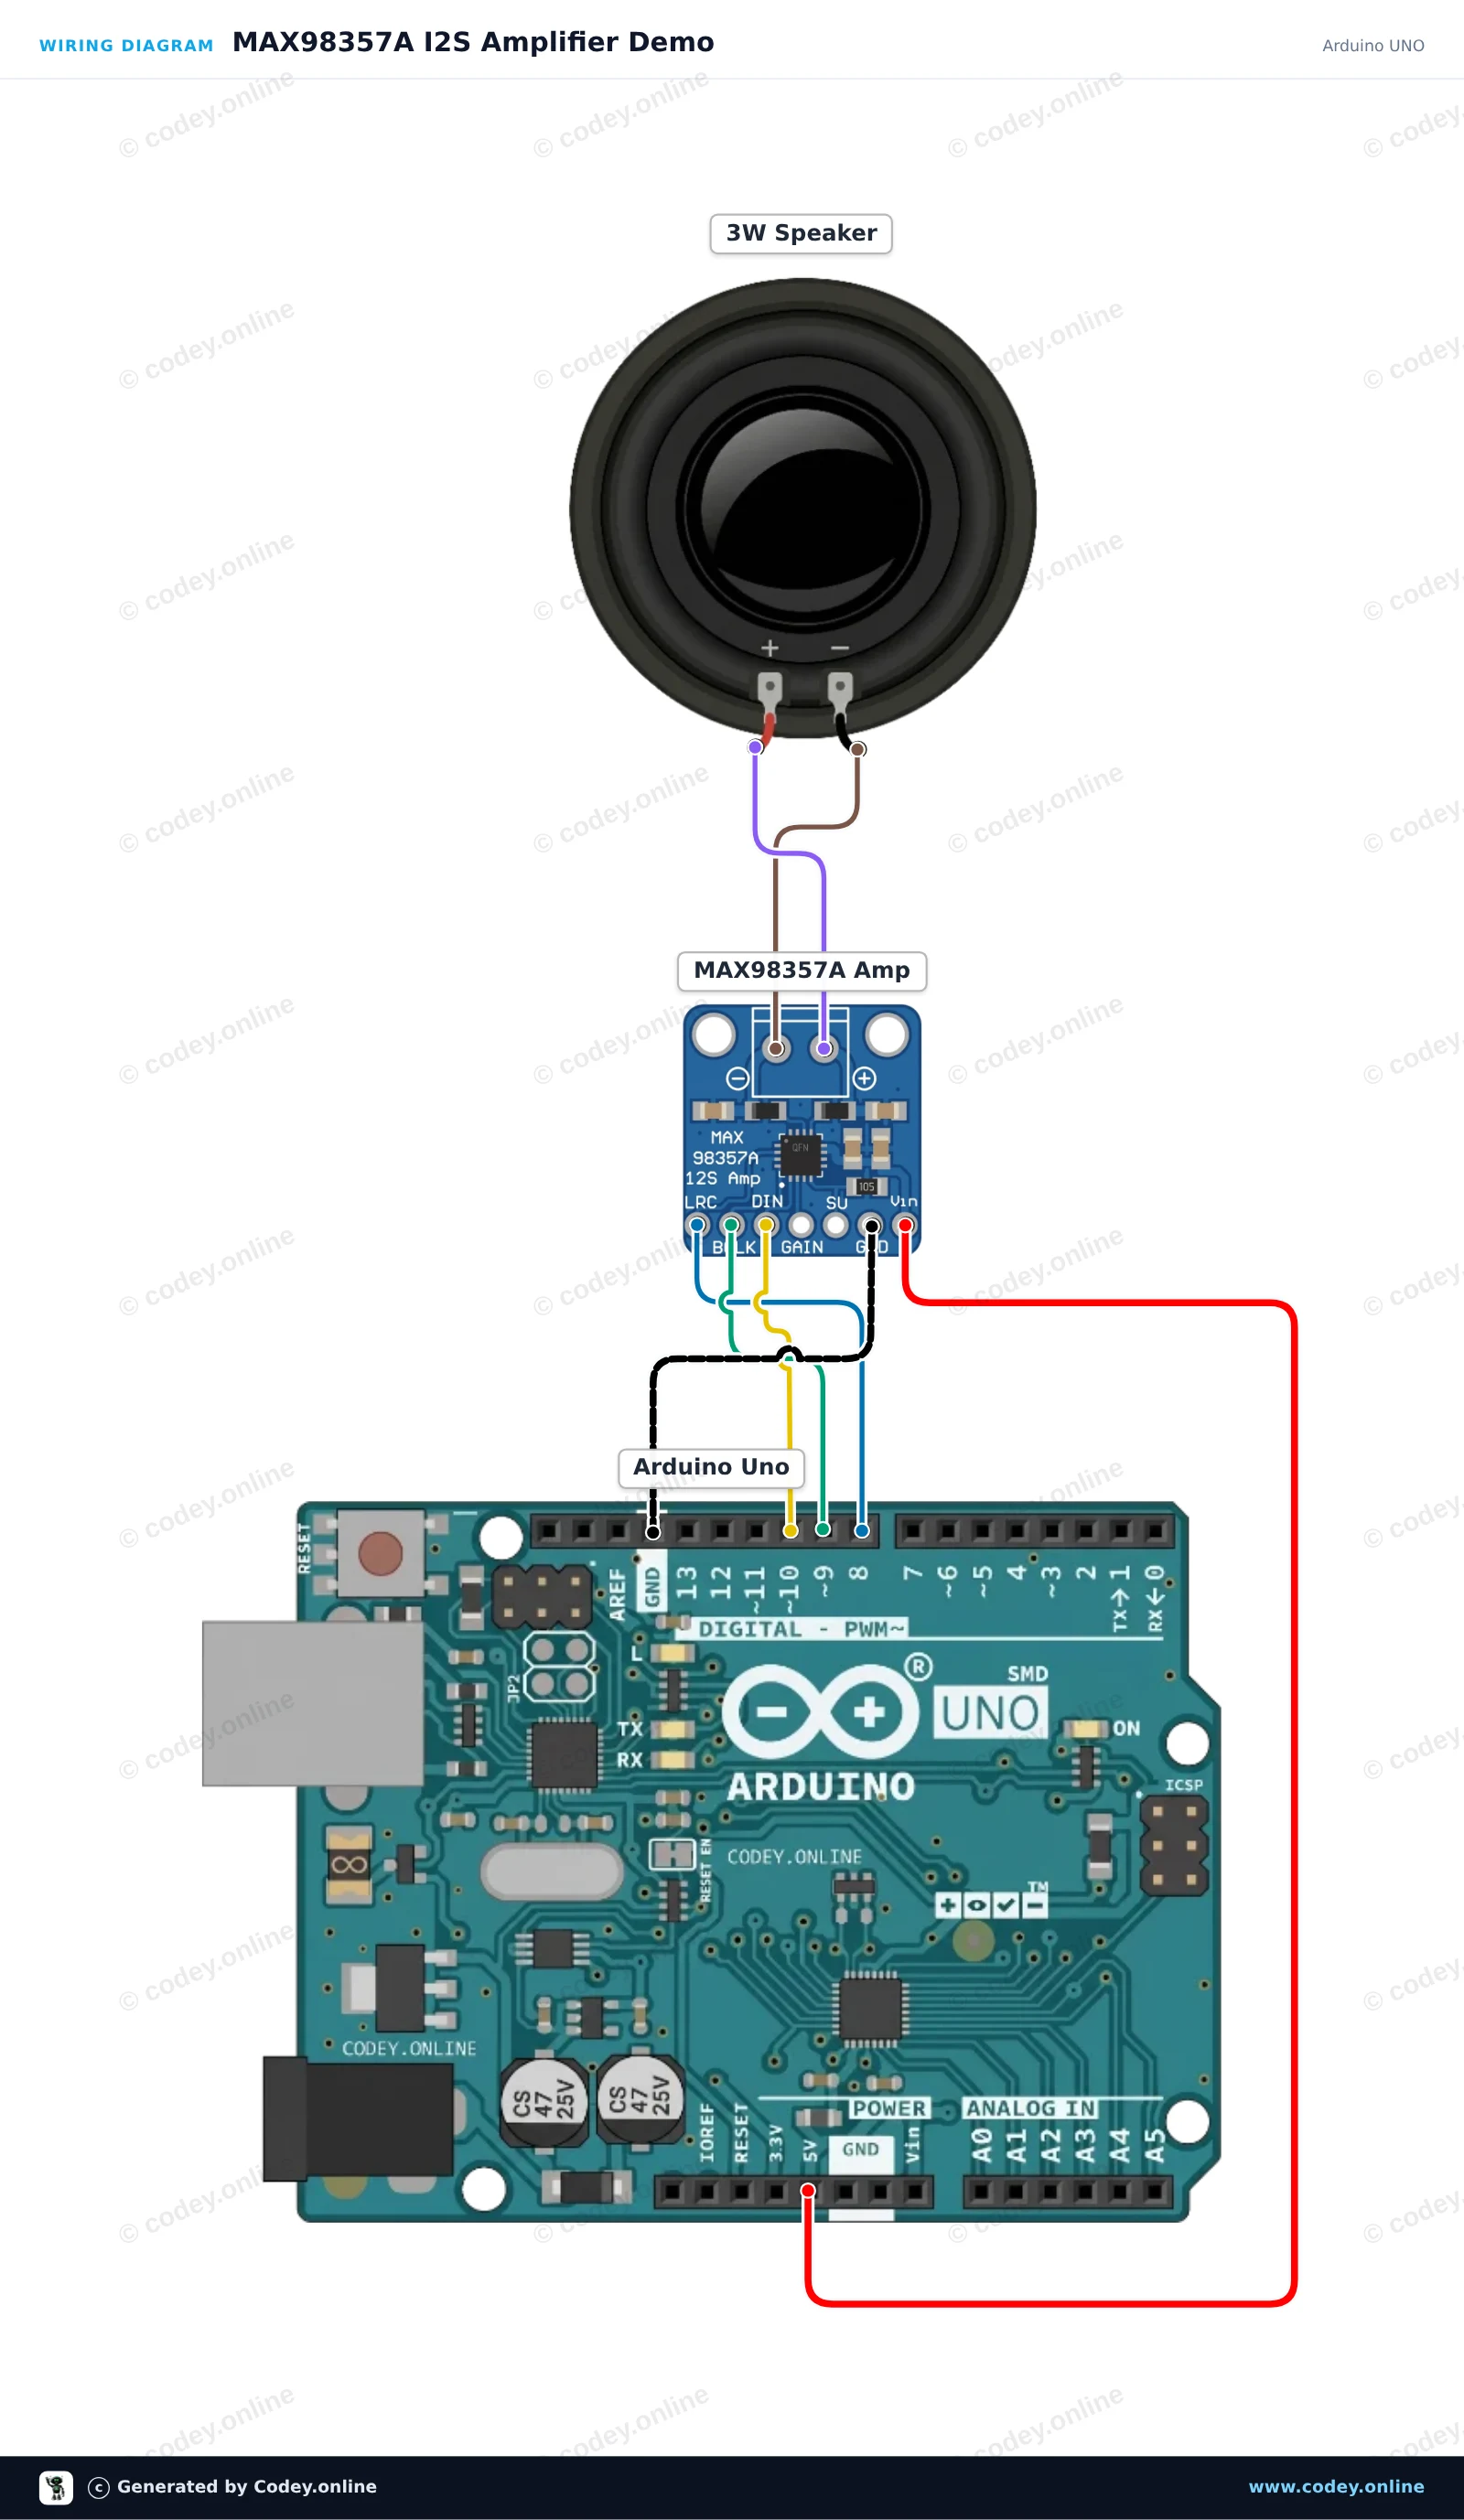
This project demonstrates the MAX98357A I2S amplifier connected to an Arduino Uno and a 3W speaker. Because the AVR-based Arduino Uno does not have a native I2S peripheral, the sketch demonstrates the interface wiring by toggling the control and data pins and outputting status messages to the Serial Monitor at 115200 baud.

Wiring diagram: I2S DAC with 3W amplifier - MAX98357A on an Arduino UNO
Wiring diagram · Click to enlarge
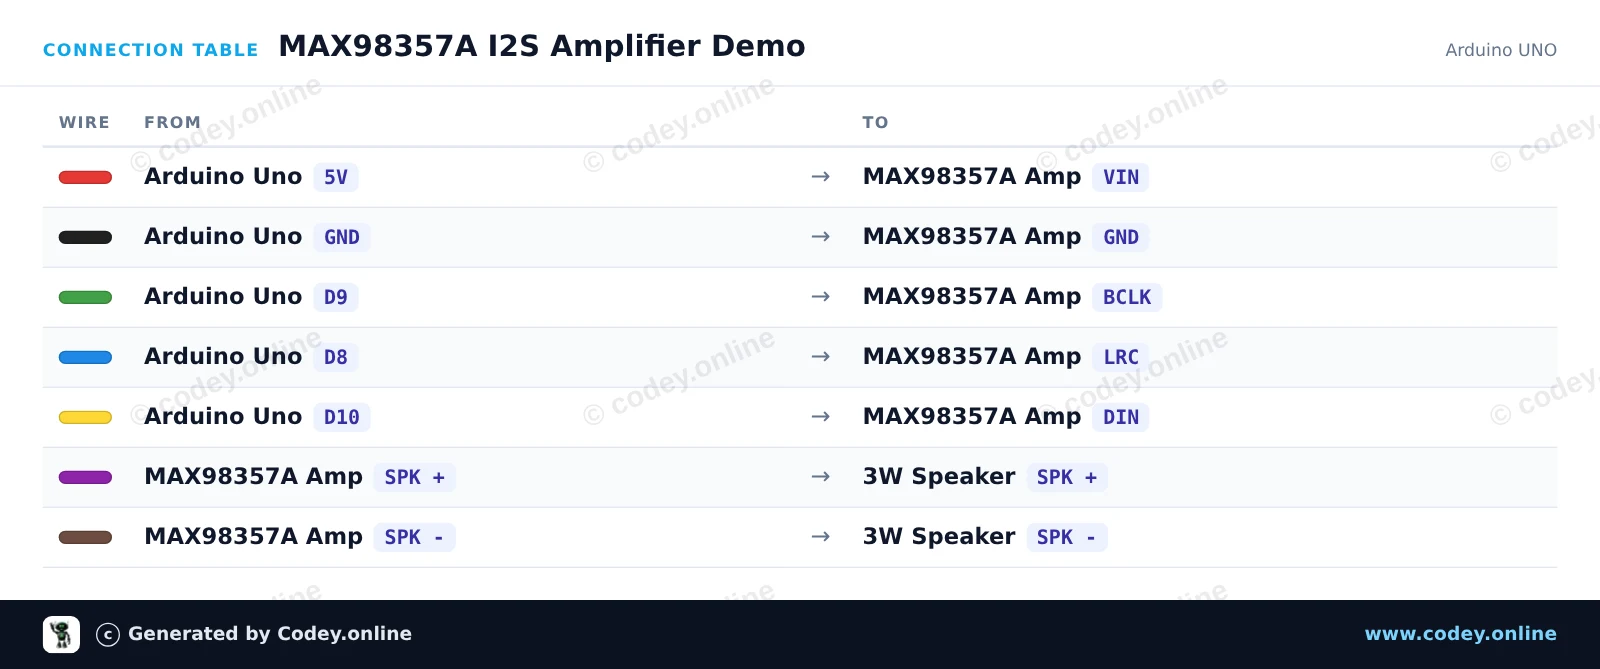
Connection table: I2S DAC with 3W amplifier - MAX98357A on an Arduino UNO
Connection table · Click to enlarge
MAX98357A_I2S_Amplifier_Demo.ino · compiled and verified
/*
 * ==================================================================
 *  Generated by Codey.online  —  https://www.codey.online
 * ==================================================================
 *  Project   : MAX98357A I2S Amplifier Demo
 *  Board     : Arduino UNO (arduino:avr:uno)
 *  Parts     : 3W amplifier MAX98357A I2S DAC
 *  Libraries : none (built-in)
 *
 *  Codey Online is an AI-powered browser IDE for Arduino and ESP32.
 *  Describe your project and Codey writes the code, draws the wiring
 *  diagram and uploads it to your board, straight from the browser.
 *  This code is free to use, modify and share, without warranty.
 * ==================================================================
 */

// MAX98357A I2S Amplifier wiring and basic test sketch
// Note: AVR Arduino Uno does not have hardware I2S.
// This sketch verifies pin connections and demonstrates signal pulsing.

const uint8_t PIN_BCLK = 9;
const uint8_t PIN_LRC  = 8;
const uint8_t PIN_DIN  = 10;

const unsigned int toneHz = 440;
const unsigned long toneOnMs = 1000;
const unsigned long toneOffMs = 500;

void outputPulse(unsigned long durationMs, unsigned int frequencyHz) {
  unsigned long start = millis();
  unsigned long halfPeriodUs = 500000UL / frequencyHz;

  while (millis() - start < durationMs) {
    digitalWrite(PIN_DIN, HIGH);
    delayMicroseconds(halfPeriodUs);
    digitalWrite(PIN_DIN, LOW);
    delayMicroseconds(halfPeriodUs);
  }
}

void setup() {
  pinMode(PIN_BCLK, OUTPUT);
  pinMode(PIN_LRC, OUTPUT);
  pinMode(PIN_DIN, OUTPUT);

  digitalWrite(PIN_BCLK, LOW);
  digitalWrite(PIN_LRC, LOW);
  digitalWrite(PIN_DIN, LOW);

  Serial.begin(115200);
  Serial.println(F("MAX98357A Amplifier Test"));
  Serial.println(F("Pins initialized: BCLK=9, LRC=8, DIN=10"));
}

void loop() {
  Serial.println(F("Signal ON (440 Hz pulse)"));
  outputPulse(toneOnMs, toneHz);

  Serial.println(F("Signal OFF"));
  digitalWrite(PIN_DIN, LOW);
  delay(toneOffMs);
}

Wiring diagram and example code generated by Codey.online — https://www.codey.online

ESP32 I2S Audio Tone Generator with MAX98357A

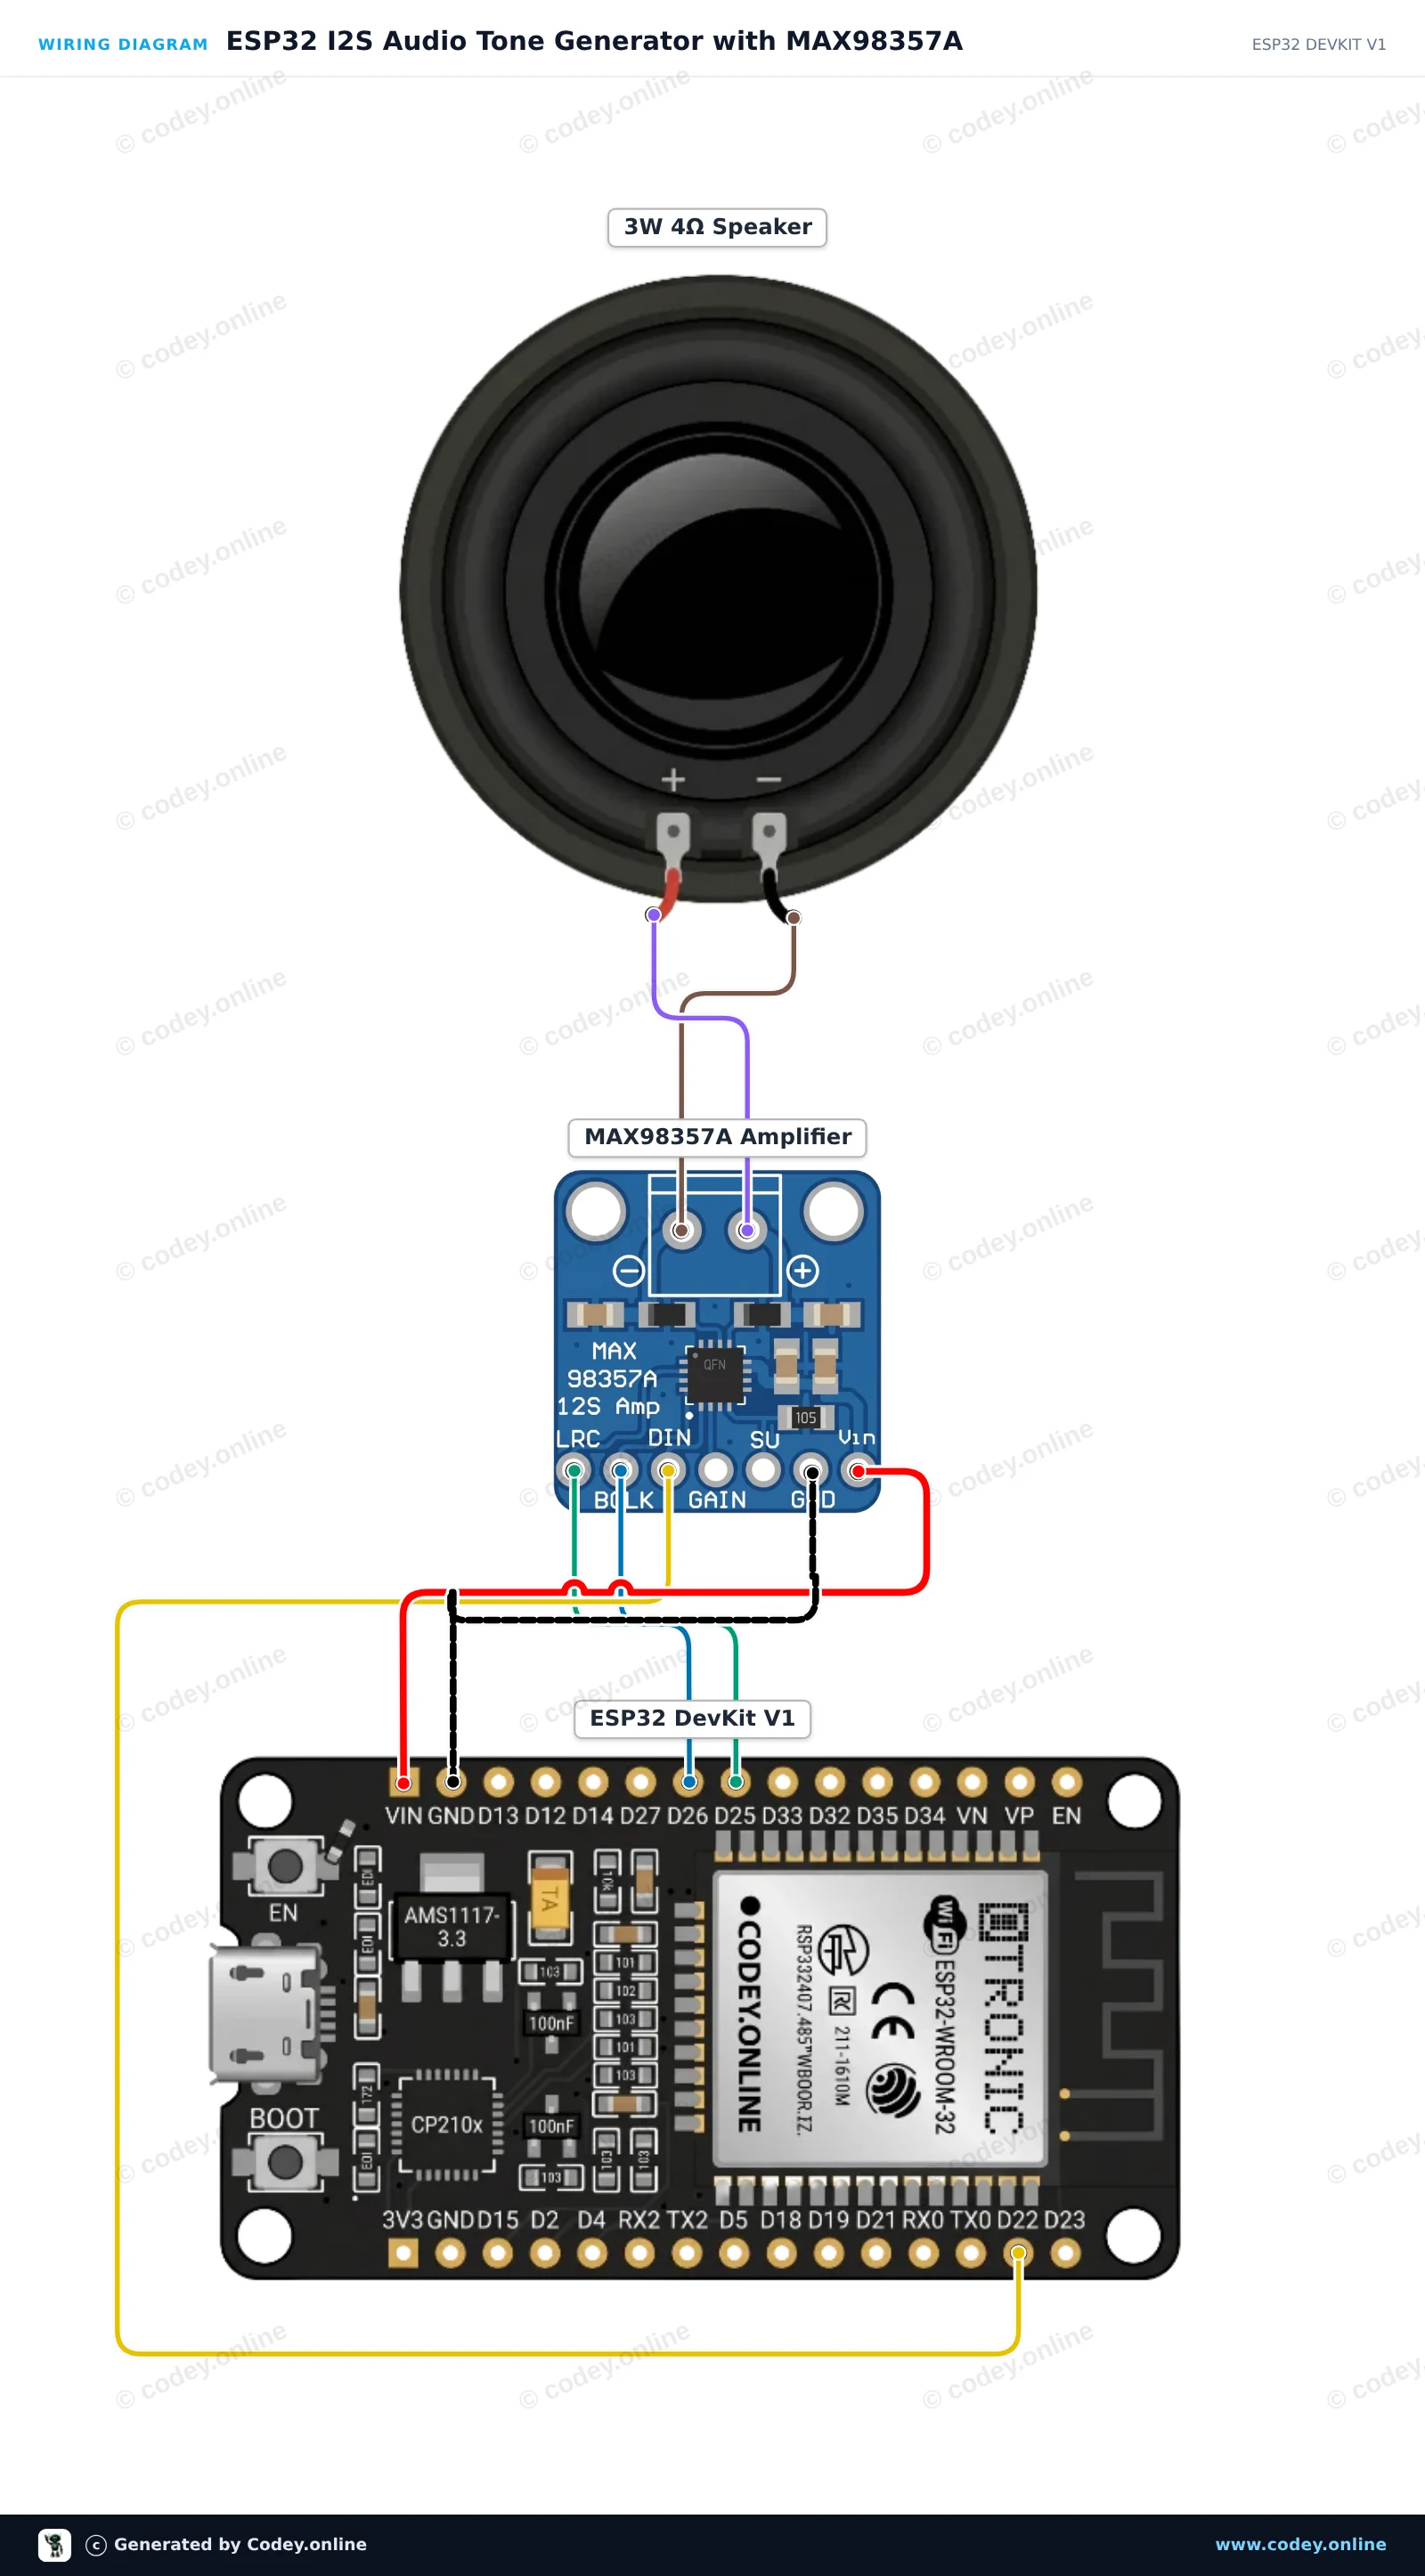
This project plays alternating audio tones through a 3W speaker using the MAX98357A I2S digital audio amplifier. The ESP32 synthesizes 16-bit PCM audio in real time and streams it over the I2S bus directly to the DAC amplifier.

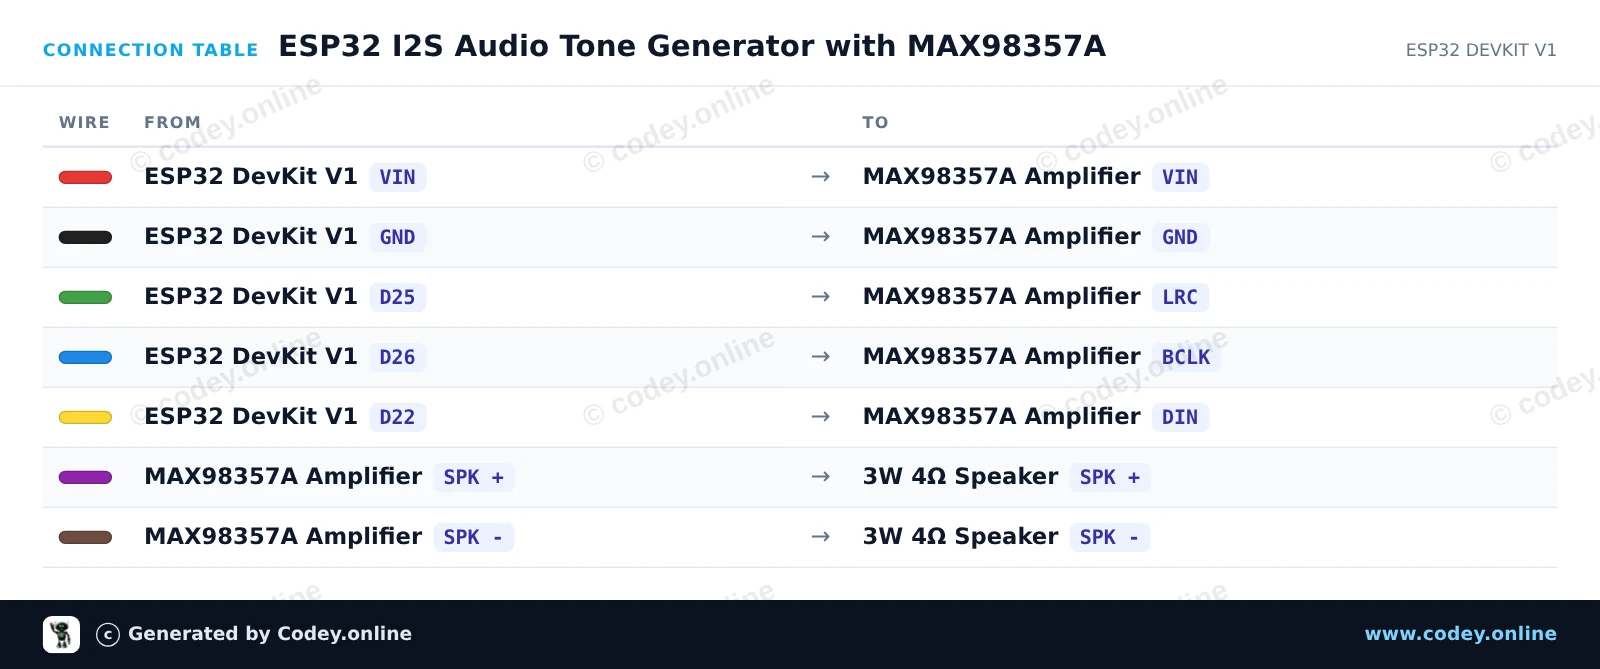
Wiring diagram: I2S DAC with 3W amplifier - MAX98357A on an ESP32 DevKit V1
Wiring diagram · Click to enlarge
Connection table: I2S DAC with 3W amplifier - MAX98357A on an ESP32 DevKit V1
Connection table · Click to enlarge
ESP32_I2S_Audio_Tone_Generator_with_MAX9.ino · compiled and verified
/*
 * ==================================================================
 *  Generated by Codey.online  —  https://www.codey.online
 * ==================================================================
 *  Project   : ESP32 I2S Audio Tone Generator with MAX98357A
 *  Board     : ESP32 DEVKIT V1 (esp32:esp32:esp32doit-devkit-v1)
 *  Parts     : 3W amplifier MAX98357A I2S DAC
 *  Libraries : none (built-in)
 *
 *  Codey Online is an AI-powered browser IDE for Arduino and ESP32.
 *  Describe your project and Codey writes the code, draws the wiring
 *  diagram and uploads it to your board, straight from the browser.
 *  This code is free to use, modify and share, without warranty.
 * ==================================================================
 */

#include <Arduino.h>
#include "driver/i2s.h"
#include <math.h>

#define I2S_BCLK 26
#define I2S_LRC  25
#define I2S_DIN  22

#define SAMPLE_RATE 44100

void setup() {
  Serial.begin(115200);

  i2s_config_t i2s_config = {
    .mode = (i2s_mode_t)(I2S_MODE_MASTER | I2S_MODE_TX),
    .sample_rate = SAMPLE_RATE,
    .bits_per_sample = I2S_BITS_PER_SAMPLE_16BIT,
    .channel_format = I2S_CHANNEL_FMT_RIGHT_LEFT,
    .communication_format = I2S_COMM_FORMAT_STAND_I2S,
    .intr_alloc_flags = ESP_INTR_FLAG_LEVEL1,
    .dma_buf_count = 8,
    .dma_buf_len = 64,
    .use_apll = false,
    .tx_desc_auto_clear = true
  };

  i2s_pin_config_t pin_config = {
    .bck_io_num = I2S_BCLK,
    .ws_io_num = I2S_LRC,
    .data_out_num = I2S_DIN,
    .data_in_num = I2S_PIN_NO_CHANGE
  };

  i2s_driver_install(I2S_NUM_0, &i2s_config, 0, NULL);
  i2s_set_pin(I2S_NUM_0, &pin_config);

  Serial.println("MAX98357A I2S Tone Generator Ready!");
}

void playTone(float freq, int durationMs) {
  int totalSamples = (SAMPLE_RATE * durationMs) / 1000;
  size_t bytesWritten;
  int16_t buffer[128];
  
  float phaseStep = 2.0 * PI * freq / SAMPLE_RATE;
  float phase = 0.0;
  
  int samplesRemaining = totalSamples;
  while (samplesRemaining > 0) {
    int toWrite = min(64, samplesRemaining);
    for (int i = 0; i < toWrite; i++) {
      int16_t sample = (int16_t)(sin(phase) * 6000.0);
      buffer[i * 2] = sample;     // Left channel
      buffer[i * 2 + 1] = sample; // Right channel
      phase += phaseStep;
      if (phase >= 2.0 * PI) phase -= 2.0 * PI;
    }
    i2s_write(I2S_NUM_0, buffer, toWrite * sizeof(int16_t) * 2, &bytesWritten, portMAX_DELAY);
    samplesRemaining -= toWrite;
  }
}

void loop() {
  Serial.println("Playing 440 Hz (A4)...");
  playTone(440.0, 400);
  delay(100);

  Serial.println("Playing 880 Hz (A5)...");
  playTone(880.0, 400);
  delay(1000);
}

Wiring diagram and example code generated by Codey.online — https://www.codey.online

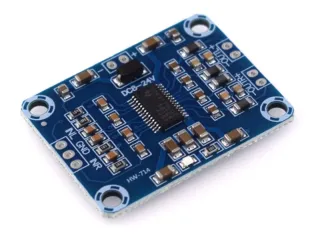
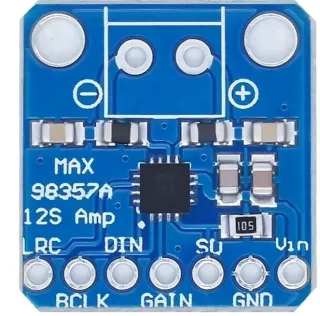
I2S DAC with 3W amplifier - MAX98357A

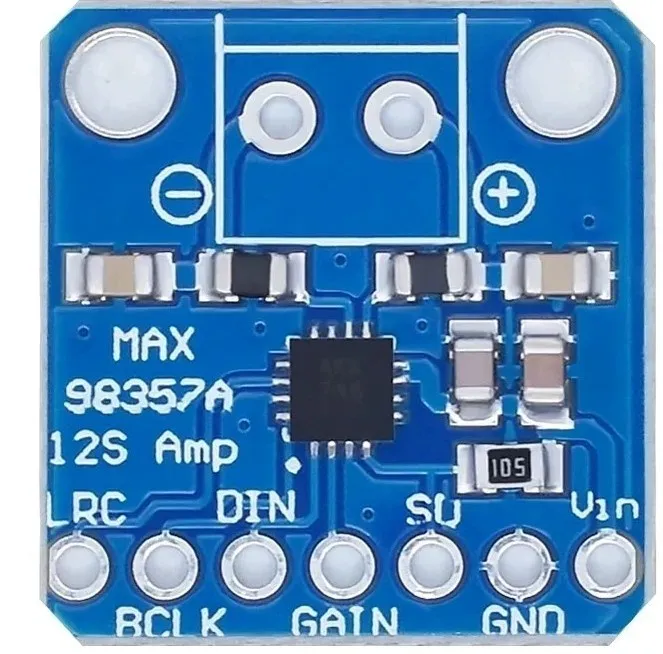
If you’re looking for an easy and affordable way to boost your digital audio files, then the MAX98357 I2S Amp Breakout is for you. It takes standard I2S digital audio input and not only decodes it to analog, but also amplifies it directly to a speaker. Perfect for adding compact amplified sound, it combines 2 breakouts (I2S DAC + Amp) into one.

What is I2S?

I2S is a digital audio protocol used on circuit boards to pass audio data. Many advanced chips and processors handle all audio in digital I2S format. To input or output data, three or four pins are used (data in, data out, bit clock, and left-right channel select). Usually, audio devices use a DAC chip that speaks I2S and converts it to analog that can drive headphones.

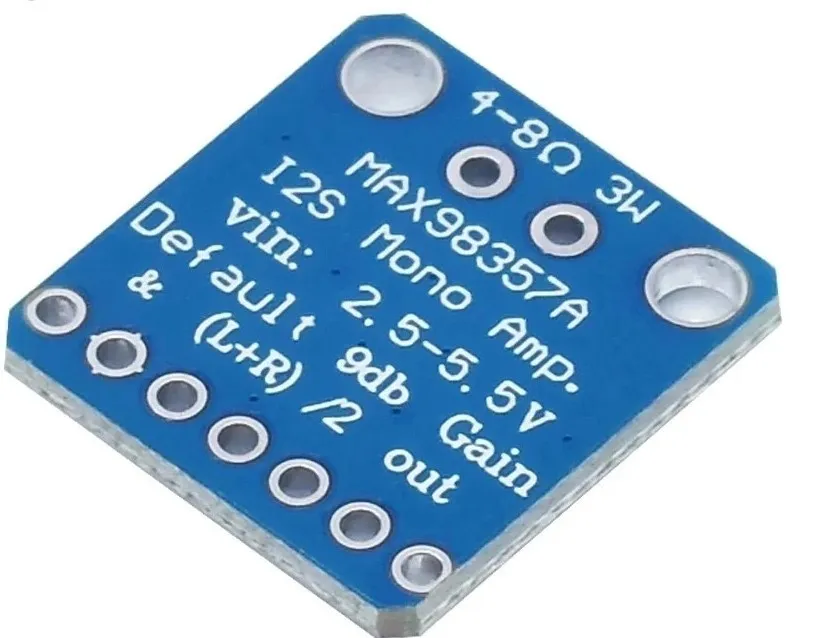
This small mono amplifier is surprisingly powerful - it can deliver 3.2 watts of power to a speaker with an impedance of 4 ohms (at 5V supply and 10% THD). Inside the miniature chip is a class D controller, which operates on a supply voltage of 2.7V-5.5VDC. Because the amplifier is class D, it is extremely efficient, making it perfect for portable and battery-powered projects. It has built-in thermal and overcurrent protection, but we barely noticed it getting warm.

The audio input is I2S standard; you can use 3.3V or 5V logic data. The outputs are "Bridge Tied" - meaning they connect directly to the outputs, without connection to ground. The output is a ~300KHz square-wave PWM that is then 'averaged' by the speaker coil - the high frequencies are not heard. All of the above means that you cannot connect the output to another amplifier; it must drive the speakers directly.

There is a Gain pin that can be adjusted to change the amplification. By default, the amplifier gives you 9 dB of gain. By connecting a pull-up or pull-down resistor, or wiring it directly, the Gain pin can be set to 3 dB, 6 dB, 9 dB, 12 dB, or 15 dB.

The ShutDown/Mode pin can be used to put the chip into sleep mode or to set which I2S audio channel is routed to the speaker. By default, the amplifier outputs a (L+R)/2 stereo mix to mono output. By adding a resistor, you can change it to output only left or only right.


Specifications:

  • Output power: 3.2W at 4Ω, 10% THD, 1.8W at 8Ω, 10% THD, at 5V supply
  • PSRR: 77 dB typ. at 1 kHz
  • I2S sample rates from 8 kHz to 96 kHz
  • No MCLK required
  • Click + Pop reduction
  • Five pin-selectable gains: 3 dB, 6 dB, 9 dB, 12 dB, 15 dB
  • Thermal shutdown protection
  • Comes with 7 header pins and 2 screw terminals


  • I2S DAC
  • Mono output
  • Adjustable gain
  • Class D

Why choose this product?

  • Two functions in one – I2S DAC and amplifier in one
  • Direct to speaker – Drives the speaker directly
  • Adjustable gain – Choice from 3 dB to 15 dB
  • Efficient design – Suitable for portable projects
  • Protected use – Thermal and overcurrent protection
Specifications
Supply voltage2.7V-5.5VDC
Output power3.2W at 4Ω, 10% THD, 1.8W at 8Ω, 10% THD, at 5V supply
PSRR77 dB typ. at 1 kHz
Five pin-selectable gains3 dB, 6 dB, 9 dB, 12 dB, 15 dB
I2S sample rates8 kHz to 96 kHz

In the package

  • I2S DAC with 3W amplifier - MAX98357A
  • 7 × header pins
  • 2 × screw terminals

Frequently bought together

Total: € 17,35

Reviews

No reviews yet.

Write a review
Your rating

Shipping & returns

Shipping

  • Parcel with track & trace€ 7,70Within 24 hours
  • Pick up at PostNL location€ 7,40Within 24 hours
  • Letterbox parcel€ 3,70Within 2 business days
  • Letterbox parcel 24 hours€ 4,55Within 24 hours
  • Pick up in storeFree
All about shipping

Returns

Not satisfied? You have 30 days after delivery to return the product.

All about returns

Recently viewed